Equipment Needed to Start Using Zwift
 New or Curious about Zwift?
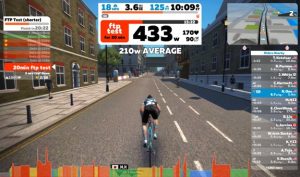
Zwift is an interactive, social virtual ride community that offers courses and rides for riders of all levels. No single innovation to date has done more to make training more interactive and enjoyable for more riders.
Zwift’s rise in popularity has by all accounts been meteoric. The virtual world Zwift offers covers the entire gamut: a fun distraction to make long trainer rides more engaging, a place to build and develop around structured training plans, a place for social riding in a group environment and a place to race and test your limits.
Here is a general overview of how to get into the Zwift game as well as an overview of some of the best uses of these new tools and who they suit best.
Getting Started with Zwift – Things You’ll Need
There are loads of resources on the internet that explain the possible combinations of equipment that you’ll need to get into Zwift. Our goal here isn’t to exhaust that. This is a basic overview of compatible trainer combinations and some of the main benefits and considerations of each.
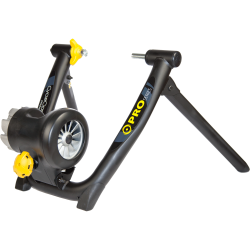
Option 1 – “Dumb” Trainer + Speed and Cadence
 This is the most basic and budget friendly set-up for Zwift and other virtual ride platforms (Trainer Road, Rouvy, etc.). A “dumb” trainer simply means that it is not electronic and the resistance is mechanically generated by fluid, air or magnets.
A speed sensor and a cadence sensor and a heart rate monitor would be a wise addition to your trainer experience with this type of trainer, but is not required.
Who’s It For: For riders who haven’t previously worked with power-based training, this is a very easy way to progress into that world.
Pros: Low cost and easy to set up.
Cons: There are accuracy and feature compromises with this set-up. It will not provide the most realistic ride feel of the options when used with Zwift.
Notes: There are a number of ways to connect with Zwift and other systems. For that reason, the best bet is to use or purchase sensors that are capable of transmitting both ANT+ and BlueTooth signals. There are a number of options out there these days for all of those sensors. But using primarily BlueTooth sensors will make the path to getting connected to Zwift easier and give you more options.
Option 2 – Power Meter + “Dumb” Trainer:
 This is one of the easiest paths to connect to Zwift and other virtual outlets.
Who’s It For: Riders who are already using a power meter or riders who use or plan to use a power meter for both indoor and outdoor riding and/or racing.
Pros: Using a power meter and a “dumb” trainer means that increasing or decreasing resistance occurs in response to changes in gearing and cadence. In many respects, it is better to train yourself to maintain specific effort levels through shifting and cadence versus using ERG mode in a smart trainer. If you are using a structured training plan, there is an added benefit in the form of training yourself to sustain those effort levels.
You can gain the benefits of power training inside and outside with a power meter.
Cons: Speed in Zwift, and others, is dictated by wattage along with the size and weight of the rider. Without a smart trainer, the speed of your avatar/rider in the game is going to be dictated just by power alone. This means if you are just looking to ride without a structured training element, you have to manually respond to changes in the terrain by shifting from harder gears to easier gears, etc. Using a “dumb” trainer makes the Zwift environment less interactive than it is with a smart trainer.
Option 3 – Smart Trainer:
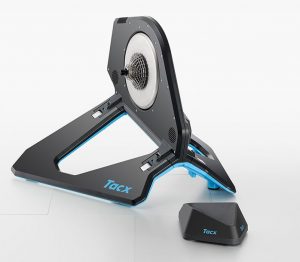 Smart trainers from brands like CycleOps, TACX, Kickr’ and Bkool are the Cadillac of indoor training environments for many. They make the Zwift experience feel more realistic to real riding and allow you to take full advantage of available features.
Who’s It For: Most anyone looking to increase realism and optimize functionality. I can’t recall a time when someone bought a modern smart trainer and told me later that they wanted to switch back to a “dumb” trainer. Smart trainers can be particularly well-suited to riders who either don’t want to follow a structured training plan or those who find following a structured workout either too tedious or difficult as they are as close to riding outside as you can get.
Pros: The smart trainer itself reads power output and simulates changes in grades in a virtual ride in a way that makes it feel like you are riding uphill for flying down the descent. In an unstructured training environment, these simulated changes in grade allow you to train at a variety of intensity levels without really thinking about it – more like riding outside.
For those using structured training plans, the trainer can be set into ERG mode and the workout can be programed into the system, so you simply pedal and the trainer changes the resistance to match whatever is prescribed by the workout.
Cons: For a rider who understands the features and set-up of their smart trainer, there are very few considerations to a smart trainer in combination with Zwift.
This beings said, if we dig, you should be aware that you have to change settings in order to do certain things that you can do just by shifting gears on a “dumb” trainer.
For example, as mentioned above, there is a benefit to training yourself to maintain a given effort level through shifting and cadence – there is no “ERG Mode” in the real world. Doing a structured workout in Zwift, without using an ERG setting simultaneously, means that you will have to adjust things in the workout and in response to grade changes in the virtual ride course to get a specific interval type workout. This is a pretty good simulation for outdoor riding, but may diminish from executing a very specific workout. The end result, without doing additional set-up, is more volatility in a given interval or workout than you would get on a “dumb” trainer.
There are some work arounds to the above situation in Zwift. One solution is to change the settings on Zwift to reduce the response to grade changes on the trainer (essentially temporarily converting your trainer back to “dumb” mode). Understood and adjusted properly, a smart trainer can be a best of all worlds, but you have to think about things a bit different.
Option 4 – Smart Trainer + Power Meter:
For those who want the most comprehensive indoor training environment and the same level of precision and accuracy outdoors, using a smart trainer and a power meter is the way to proceed.
Who’s It For: Those that need consistent power-based training both indoors and outdoors and want the flexibility to create a diverse training environment indoors.
Pros: Consistent measurement of power both indoors and outdoors with all of the simulation benefits of virtual trainers.
Cons: None. This set up covers all aspects of things.
Connecting Equipment to Zwift
PC/Mac Methods:
There are a number of ways to link your trainer, power meter and other sensors to Zwift. You can either use a laptop or PC, install the Zwift program on your computer and pair your sensors or smart trainers wirelessly to the program.
ANT+ Sensors:
In the event that you are using ANT+ only sensors (Garmin speed or cadence sensors, older Garmin heart rate monitors, SRM power meters, older Quarq power meters), you will need an ANT+ dongle inserted into an available USB slot on your computer.
BlueTooth Sensors:
For BlueTooth sensors (modern smart trainers, most current power meters, or BlueTooth specific speed or cadence sensors) you should be able to directly pair those to that Mac or PC without any additional steps.
Tablet or Smart Phone Methods:
In addition to using a laptop or desktop computer, you can also connect to Zwift via a tablet or smart phone with Google Play and IOS (iPhone and iPad) apps. Not all of us want to set up a bike trainer in our living rooms or near our TV’s or home computers. This could also potentially be an easier way to recast your phone or iPad screen onto a full-sized TV if you want the entire Zwift experience without directly connecting your home TV to your computer.
Notes: If you have an ANT+ type power meter without BlueTooth capability (older Quarq or an SRM, for example), pair the power meter with your smart trainer to synchronize the power readings between the two and then transmit that synchronized power number to Zwift.
If you are planning on using an iPhone or iPad for Zwift and have an ANT+ only power meter, the smart trainer solves this problem without having to replace your power meter.
Beyond the basic set-up, the in-ride features, training plans and other elements of Zwift are too numerous to cover in a single piece. As always, we are all here to answer questions about the equipment and technology you’ll need to take advantage of the new environments that modern technology affords.
Fit Werx sells and supports most modern bike trainers (Wahoo, TACX, CycleOps, Kurt Kinetic, Bkool…). Before clicking the “buy now” button on the manufacturer’s site, consider buying from us. We depend on your equipment business to offer the services and information we provide.