Aero Position Progression – The Continued Exploration of the Aero Riding Position of Master’s National Champion Dean Phillips
Background and Old Position:
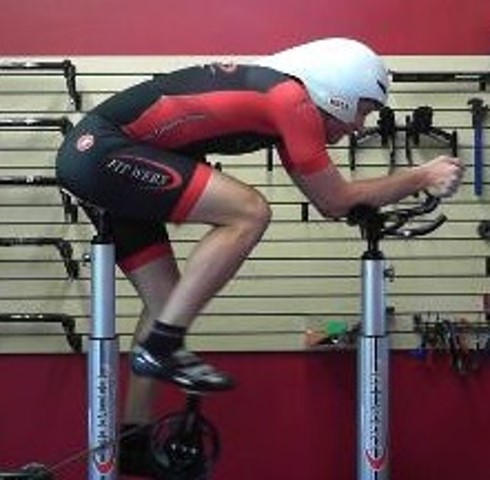
Up until 2017, I spent many years testing and fine tuning my aero position. I was pursuing record; records where set-up details matter a lot. I documented a lot of this in prior posts. However, I stopped riding the position I had put so much time into refining a few years ago. A number of culprits, ranging from taking a year off the bike to back and neck issues all made riding in this particular aerobar position (see below) too difficult.
Aside from a few minor tweaks, the following photo captures my 2014-2017 aero position:
 Itching to Race Again
In 2020, I found myself chomping at the bit to start competing on the track again. Things were going well on the road bike, which was promising. However, for comfort reasons in the aerorbars, I needed my saddle to move forward and my reach reduced to relieve my hip, back and neck. Sadly, in my case, this increased my drag and made me slower for my short and high intensity track events.
What is that saying about necessity being the mother of invention? It was clear that I was going to have to start inventing if I was going to go anywhere close to my prior speed on the track again.
Finding My New Aero Position
I’ll preface the rest of this post. There is too much experimenting to cover all that I did in building this new position.
I can tell you that many hours were spent testing crouches on the road bike, sitting on the tip of the saddle where my power and back felt good (but saddle didn’t…) and countless arrangements of placing my forearms on the tops of the handlebars in different positions. All of this was in search of what ‘felt’ like a fast position.
I’ve tested the aerodynamics of my position and equipment for a long time. Long enough that I can tell when I hit a sweet spot for low drag. The feeling of air on my arms goes away. The helmet gets quieter. Friends drafting behind me start ‘complaining’. And, of course, the data looks good.
After much time, the “sweet spot” sensations happened on the road bike. I was encouraged. It was now time to take what I had created on the road bike and start translating it to use with aerobars on a track bike.
Moving My New Baseline Position to the Track Bike
I spent a month on the rollers tweaking an ISM PS1.0 saddle on my track bike into a very similar position to my road bike. My tweaking included breaking up indoor rides by swapping the track bike (with ISM saddle) and road bike (with Aliante saddle) back and forth. I placed mirrors in front and beside me and tweaked things until I was convinced the ISM saddle position on the track bike looked and felt the same as it did with my Aliante on my road bike. This turned out to be the “easy” part of the setup.
Next, I needed to replace my road bar with aerobars simulating what felt like the fastest forearm position. I used Zipp’s Vuka aerobars as they’re proven and very adjustable – both things of high value to me.
My shoulders, arms, and head behave differently relaxing in aerobars compared to leaning on forearms on a road bar. Getting things dialed in took a lot more time than expected. Thankfully, I eventually got there.
I now had a new track bike position that I felt like I could at least race. I was also confident that I could improve it with testing.
 Wind Tunnel Verification:
I made a trip to the A2 wind tunnel in North Carolina to test some aerobar positions, helmets, skinsuits, and pretty much anything else I could squeeze in. A real wind tunnel, like A2, is a lot of fun. You can test so many things in such a small amount of time and the results are available in seconds. The experience is pricey, but not wanting to put another 15 years into getting this new position as refined as my old, the wind tunnel seemed the path to quick results.
I tested dozens of setups in the tunnel. I found some improvements and ruled out a number of things that didn’t work. I tested everything at both 0 and 5 degrees of Yaw. It is amazing how adding just five degrees of Yaw in the tunnel feels like a crosswind in the real world.
The trip was a success and, according to the data, I came home with a faster position.
A Minor Setback
Among the many things we tested in the wind tunnel was a longer reach “mantis” (forearms tilted up to the UCI legal limit) with narrow elbows position. It felt fine in the tunnel and I could produce decent power. However, I had a setback with my neck soon after my trip that prevented riding outside for a month.
It was clear that I needed to reduce my reach and/or widen my elbows to keep my neck happy in the aerobars. Fortunately I had plenty of data from other pad widths and flatter arms earlier in the session, so I ‘fell back’ to that setup. Thankfully my neck started to cooperate.
Field Testing and 2021 Track Nationals Position:
Outdoor riding season had arrived and it was time for some Chung method field testing with the new position, something I hadn’t done in five years.
In field testing, I used the exact same track SRM power meter, Cervelo T4 track bike, and Zipp 808-Super9 rim brake wheelset that I used in 2017.
After half a dozen field testing sessions, I learned that an even shorter reach with relatively flat forearms was fastest for me. I was getting CdA values in the 0.21-0.22 range outdoors in the new position – all-time lows for me. I felt strong too. All good signs.
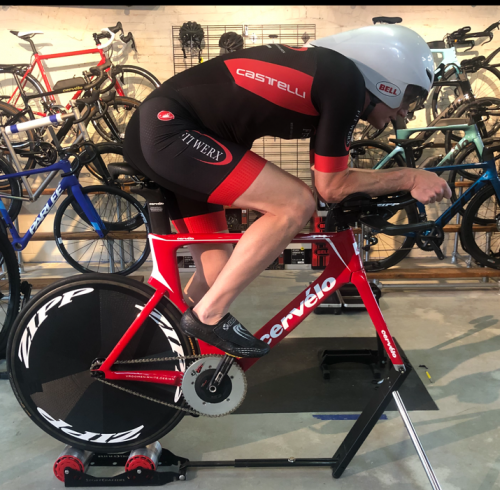
I find it funny that the position looks pretty ordinary, even if it isn’t the first position I’d place most riders on a size cycle. However, for my situation, I had to let the 15 years of data talk, so super short reach it was.
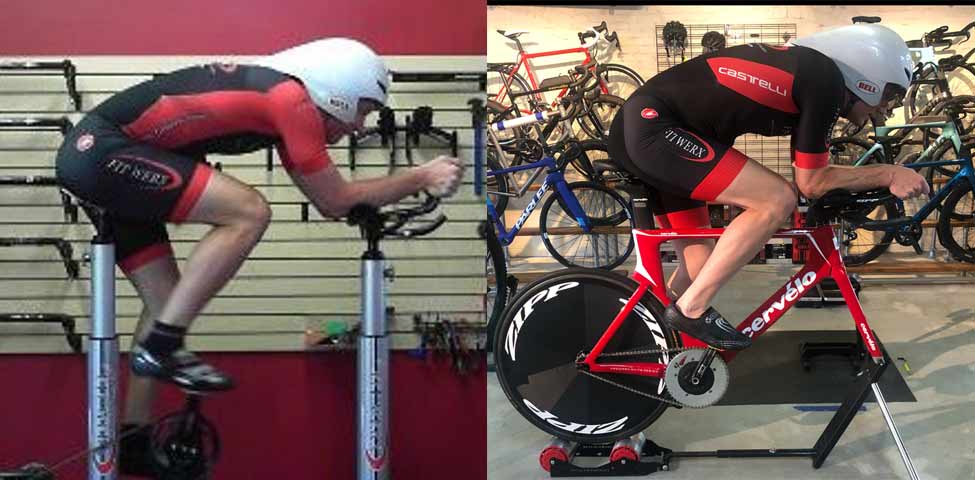
For comparison, my final 2021 position is on the right and my 2017 position is on the left.
 Fit Details
I could go on forever about how subtle changes to this new position increased drag. For example, my body really wanted to increase the reach to the end of the aerobars 15-20mm. While this highlights the difference between a position optimized for four minutes of all out effort vs. one comfortable enough to complete an Ironman, I couldn’t do extend the reach without a significant increase in drag. Gritting ones teeth for four minutes is a possibility, not so much for 4+ hours.
The position on the right is the final position I ran at 2021 Track Nationals. I went faster on slightly less power than I did last time I raced on the same track in my old position years ago.
This new “more neck and back friendly” position is my starting position for 2022. I already have ideas of other tweaks to try as I continue to try to keep ahead of Father Time’s prods at my power through aero gains.