Weak Braking? How and Why to “Bed-In” Bicycle Disc Brakes.
Did you just pull your bike out of winter storage only to find that the brakes don’t work as well as you remember? Or, do your disc brakes scream like a jealous rhesus monkey each time you squeeze the lever?
Loud and weak bicycle brakes can plague disc brake equipped bikes that have sat unused for a period of time in particular. As brake pads and rotors sit dormant they can glaze and harden and this is a leading cause of brake squeal. Likewise, glazed and hardened pads also lose their friction and grab. What can be done to get disc brakes to stop with confidence and power again?
“Bedding-In” the Brake Pads and Rotors is the Key
When disc brake systems are brand new, they don’t actually work to their potential; some are abysmally weak feeling. The reason why is that the rotors and the brake pads haven’t been 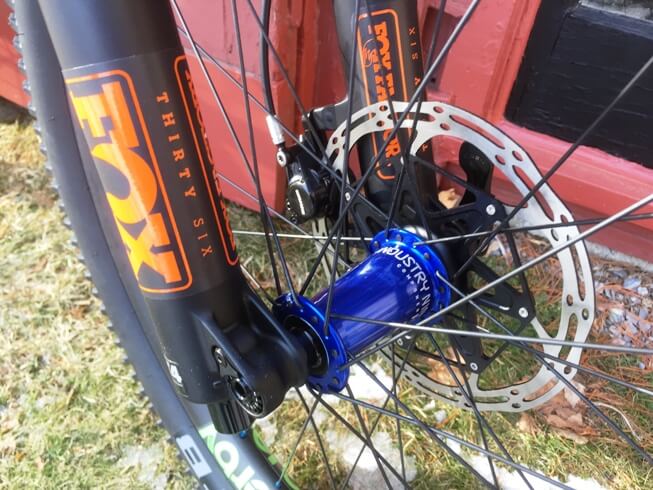 “married” to each other yet – a process called “bedding-in”. At Fit Werx, our technicians initiate the “bedding-in” process as part of our bike build. This being said, while we start the “bed-in” process when building your bike, hard use outside is necessary to bring your disc brakes up to their full potential.
If you have weak bicycle brakes on your disc equipped bike, and you know that the pads are not worn out, “bed-in” the system, even if it has been “bedded-in” previously. Your goal when “bedding-in” disc brakes is to get the pads and rotors hot enough so that they pick-up each other’s patterns. The more closely the striations on the pads and rotors correspond to each other, the more surface area they share and the better the braking performance. The heat generated from hard braking is also what helps break-up and dissipate the previously mentioned glazing and hardening that can form over time (particularly times of low use).
“How Do I “Bed-In” Bicycle Disc Brakes?”
As mentioned ab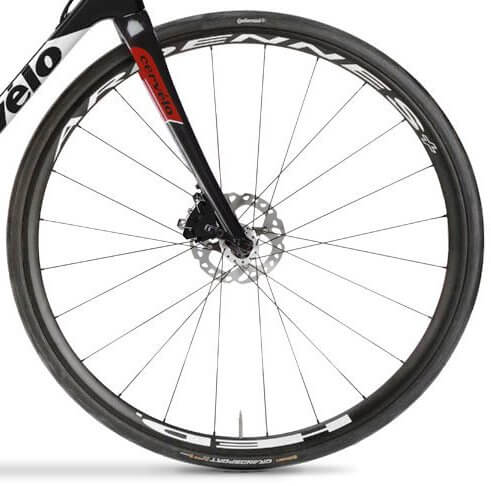 ove, your goal is to get heat into the system and get the glaze and hardening off the components. The best way to eliminate heat and to get the glaze off is to simply brake hard and often.
Note: We are not recommending that you go to the biggest hill you can find, get up to 50 mph and apply your glazed brakes. Instead, “bed-in” your brakes the safe way. Find a nice open area; get up to about 10 mph; apply one of the brakes as firmly as possible without locking the wheel. Just before coming to a full stop, release the brake and build back up to 10 mph again and do it over. Repeat 15-30 times. Do this one wheel at a time to maximize the friction and heat (one brake doing the work of two builds heat). With each repeat, the brake should slowly improve. Once complete, do the same procedure with the other brake.
“My Brakes Still Feel Weak After ‘Bed-In’. What’s Next?”
If your brakes are not improving after 30 heavy heat cycles, something else is wrong and it is time to consider having an air bleed service of the system and/or new brake pads and rotors. Likewise, some loud squeals do not disappear regardless of use or intensity. This usually means the pad or rotor is contaminated and needs replacement to quiet them. While clean is usually good when it comes to bike components, keep in mind that many brake systems recommend that you use nothing more than water to clean them; detergents and solvents can actually make loud brakes even worse and previously quiet brakes loud.
Unless you see a clear issue with the rotor (dramatic heat scorch, significant bend, deep glazing…), you can start by replacing the brake pads before you replace your rotors. Keep in mind that there are often multiple brands and types of brake pads that might work with your brake system. Some pads have more initial “bite” while others might have a more progressive feel. Either way, if you have chronic squealing of your bicycle disc brakes, changing to a different brand of pad, or changing pad compound (switching from resin to sintered/metal pads, or vice versa), can be worth a try. Regardless, don’t forget to “bed-in” the new pads with your rotors properly before hitting the road or trail.