How to Set-Up MTB Suspension – The Basics
Getting a new mountain bike is exciting. However, setting up your MTB suspension properly is as crucial to getting the most out of your mountain bike as proper bike fit. You are better off with a mediocre bike with really well set-up suspension than a really good bike with poorly set-up suspension. In other words, MTB suspension set-up is really important. With this in mind, here are some fundamentals to preliminary suspension set-up on most air based mountain bike suspension systems.
Suspension Setting Documentation & Tools
Good documentation is one of the best ways to gain an understanding of how your suspension and bike work. Write down your settings. Before and after riding, take notes about suspension air pressure, rebound and compression settings, and tire selection and air pressure so that when you adjust things you know where you were, where you are, and where you may want to go.
When it comes to tools for basic suspension set-up, you want a shock air pump and, if your shock does not have a graph that shows travel percentage on it, a tape measure. Some rear shocks also require a small flat head screwdriver in order to adjust rebound. A friend to assist you with sag settings is also recommended.
Step 1: Open Your Compression Settings
Compression is basically the force that is required to move the suspension system through its stroke. A good basic rule to follow when it comes to getting initial compression settings is that you want your fork and shock to fully compress on the biggest hit/impact of your common rides. If you aren’t using the full range of your travel, you aren’t getting the full benefit of your suspension system.
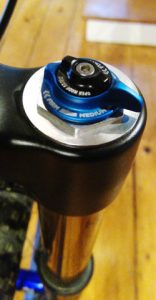
Most better quality forks have a compression adjuster knob on the top of a fork leg (usually the right). Turning this to the right makes the compression stiffer. To the left more active and softer. “Open” the system up to its most active/softest setting (full counterclockwise) to establish your baselines.
Many shocks will have a similar compression adjuster on the rear suspension system. Again, open this to its softest (most active) setting for all initial tuning.
Once you have the fork and shock compression adjusters set to their most open and active positions, you are ready to set your sag.
Step 2: Set Your Suspension Sag
Your suspension needs to compress under your weight appropriately for the system to work properly. As a starting point, your weight alone should compress the suspension 15-30% of its travel on most bikes. Some of the more active systems, like Alchemy’s Sine system or Ellsworth’s AEES system, usually ride best closer to 30% while some less active systems ride best closer to 15%. We’ll use 25% as a reference.
There are a number of ways to determine sag. Almost all Rock Shox forks and shocks have a graph on the slider that has the travel percentage marked while most Fox units do not. If your unit is 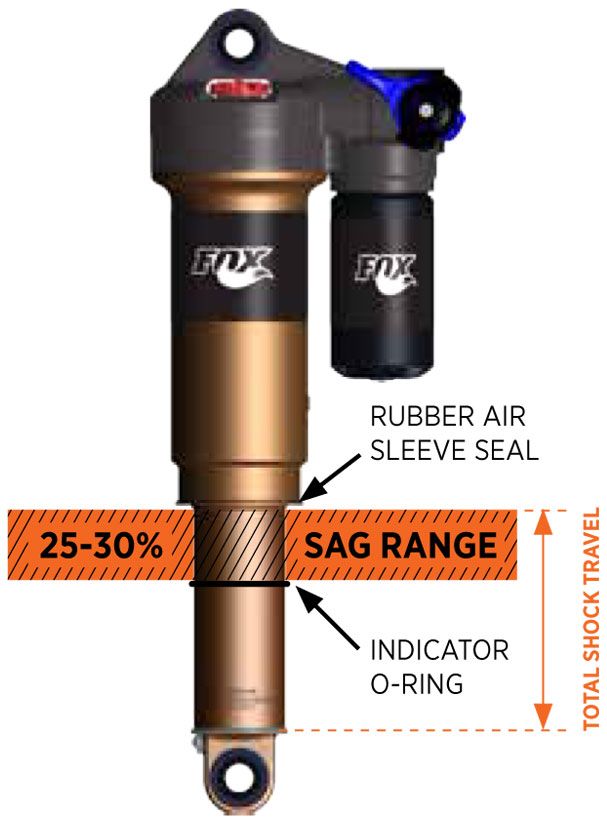 not marked, and you want to be accurate, let all of the air pressure out of your shock and fork and fully compress the unit. Mark the compression (many forks/shocks have a rubber o’ring indicator for this reason). Then fully pressurize the unit to full extension. Measure the difference from the seal between full compression and full extension. Multiply this by 0.25 and you’ll have your 25% sag target with you on the bike. While we like working in specifics, you can eyeball a quarter of the travel range if you lack any way to measure.
Once you have determined your sag target on the fork and shock shaft, find an initial air pressure number from the shock/fork or bike manufacturer’s recommendations for your weight (usually available in the manual or online). With air set to your starting psi and your compression clickers open to the full “open” setting (as described above), have a friend hold the bike up from the front for you and mount the bike. While it doesn’t work as well, you can use your hand against a wall if you don’t have an assistant.
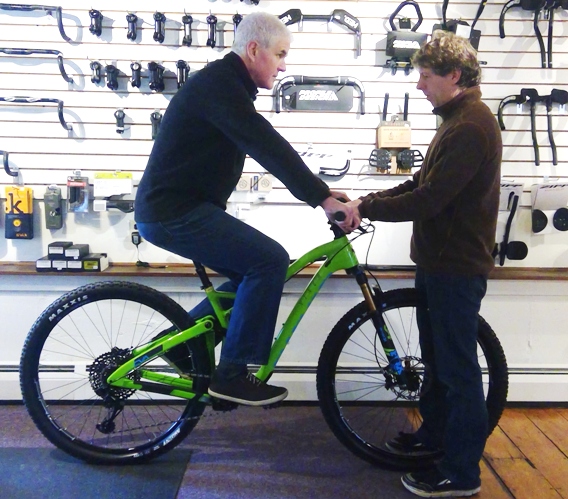 Settle the suspension by bouncing up and down a bit and then balance yourself on the bike in as natural a riding position as you can. Once balanced, slide the rubber o’ring on the suspension shafts to the top of the seal to mark your sag. Get off the bike. See how much sag you have and adjust accordingly. Increase air pressure if you are beyond 25% of the travel or decrease pressure if you are below. Repeat the above until you hit your sag target. When done, record the air pressure psi numbers for your sag.
Once you have your initial sag settings with the compression in its full “open” position, you are ready to start work on establishing baseline compression and rebound settings.
Step 3: Set Initial Rebound Settings

Rebound is how quickly a compressed suspension component returns to its uncompressed state after it has absorbed an impact. If rebound is too slow your suspension will “pack up” or dive and can feel unbalanced and like it can’t adequately absorb bumps. If rebound is too fast things can also feel unbalanced, but the bike will feel bouncy and like it can’t maintain traction. Your goal is to find the balance where the suspension returns to a less compressed state predictably and efficiently with good traction.
The rebound adjusters on many shocks are a dial adjuster at the bottom of the fork leg. Adjusters are located in a few places on rear shocks (some easier to get at than others) and you’ll want to refer to the documentation on your shock if you can’t find it easily. Turning the rebound knob counterclockwise will increase the speed that the fork decompresses and turning it clockwise will slow the speed down.
To get started, turn the knob all the way in one direction and then count how many clicks it takes to turn it all the way the other way. This is your rebound range. If you don’t have a good manufacturer recommended starting point, turn the knob to the middle of its range (if you have 20 clicks, back if off 10 clicks from either extreme) as a starting point. Your end goal with your rebound settings are to have the front and rear of the bike return evenly and at a rate that suits you well. Lighter riders with lower air pressure will often prefer faster rebound than heavier riders.
Step 4: Find a Varied Section of Trail and Ride. Adjust. Repeat.
Now for the fun part – actually riding. Put a shock pump (and possibly a flat head screwdriver…) into your hydration pack and find a repeatable section of trail that ideally has a variety of bumps, jumps and obstacles as well as corners. With your compression in the full open (most active position) ride it. Evaluate and adjust accordingly.
The Basics of How to Adjust for Common Issues
Bike Feels Bouncy or Like it Skips Upon Impact
If the bike feels bouncy or like it is trying to throw you upon landing or absorbing an impact, you need to slow the speed that the suspension rebounds (on the fork, turn rebound adjuster to right). If the suspension feels like it is “packing up” over stutter bumps it means it is not returning to its initial position quickly enough and you need to quicken the rebound (on the fork, turn the rebound knob to the left).
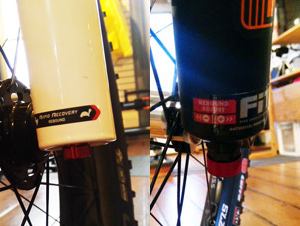
Note that it is good to note that Fox and Rock Shox describe rebound in different ways. Rock Shox shows it in terms of what turning the adjuster does to the reaction of the shock – the tortoise indicates that the shock will return slower while the hare means it will return faster. Fox refers to what turning the knob does mechanically inside the shock. Thus turning towards “+” increases rebound damping, which slows the rate of return, while turning towards “-” decreases rebound damping, which increases the rate or return. Both have their logic, but this can be confusing.
Suspension Feels Stiff or Harsh
If your bike feels stiff and like it is not absorbing impact fully, check to see how much of your travel is being used. On your biggest hits, you should be using the full travel (the rubber o’ring should be pushed all the way to the end of the shaft). If not, lower your air pressure. Again, make sure your shock is in the full open position to evaluate your baseline settings correctly.
Bike Bottoms Out Often
If your bike goes all the way through its travel too easily the system will bottom out. This can result in a harsh feeling at the end of impact absorption and sometimes an audible “clunk”. While bottoming out the suspension over the biggest hits can be a good thing, you don’t want it to bottom out all the time. If this is you, increase air pressure in the fork/shock that is bottoming.
Bike “Bucks” Going Downhill
If your bike feels like it is trying to throw you over the bars when you are descending and hitting bumps, you may need to slow how quickly the rear shock rebounds and/or you may have too little compression damping in the front fork that is throwing off your center of balance. Usually starting by slowing the rebound on the rear shock, see which helps the most.
Bike Wallows or Dives into Corners
While there is no single solution to a bike that feels like it dives or the front end washes out in corners, fork compression that is too soft or rear shock compression that is too stiff are common culprits. If it only happens in corners with bumpy enterances, you may need to quicken the rebound speed of your front fork in particular though as it may be “packing up”.
The End Goal – Balanced Suspension
Your goal with your suspension system is to establish settings where the bike tracks and handles predictably while absorbing jumps and other impacts in stride by using the full range of available travel. The hard part is realizing that the fork and shock are just two parts of the total suspension system. Everything from the linkage to your tires and tire pressure and (most importantly) your body and riding technique are also components. If you change one, it affects the others.

It is good to make suspension adjustments in small increments and to single elements of the system at a time and to record the results. Once you get the basics dialed in, many higher-end shocks and forks have a host of other more finite adjustments (like high and low speed compression damping and air spring volume) that can make a big difference. These are more advanced adjustments beyond the scope of this article.
With so many good bike designs available, there is a good argument to searching out the right shop to buy from as much (more) as the brand on the side of the bike. A good shop to buy a mountain bike from is familiar with how suspension works and will help you with your preliminary settings. They will then be there with advice after the fact to help you fine tune your set-up until things are totally dialed in.
If you would like more information on suspension settings or help finding the right mountain bike, contact us.